 By admin
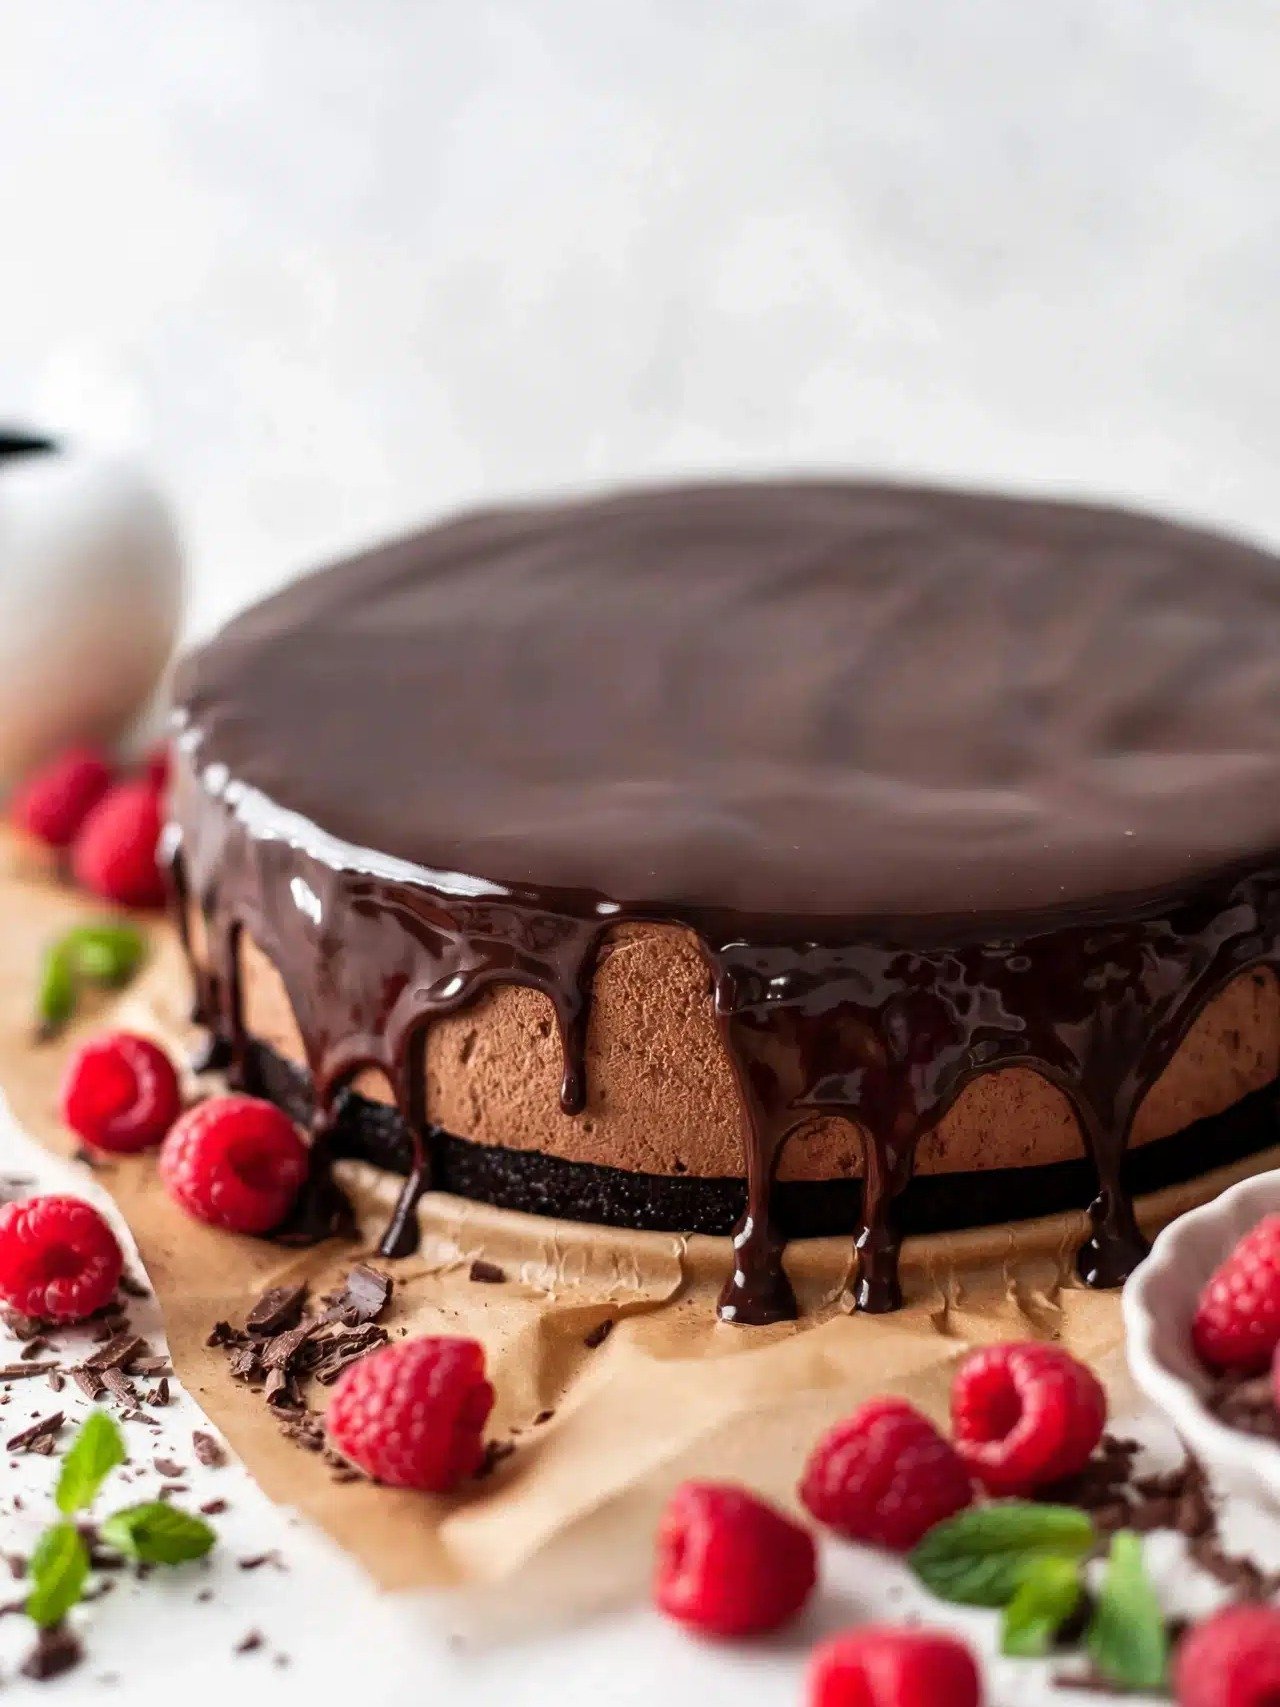
 What if I told you that the most show-stopping, melt-in-your-mouth chocolate dessert you’ve ever dreamed of is not only within your reach, but surprisingly achievable in your own kitchen? This incredible Chocolate Mousse Cake is the epitome of dessert elegance, featuring a deeply flavorful chocolate cake base, crowned with an irresistibly light and airy chocolate mousse, and finished with a shimmering, silky ganache. Whether you’re celebrating a birthday, hosting a dinner party, marking a holiday, or simply craving an impressively delicious homemade treat, this recipe is your secret weapon.
Ingredients
Let’s gather what you’ll need to create each decadent layer of this masterpiece. First up, the foundational chocolate cake:
- 1 cup all-purpose flour
- ¾ cup granulated sugar
- ¼ cup unsweetened cocoa powder
- ¼ cup black cocoa powder, sifted
- 1 teaspoon baking powder
- ½ teaspoon baking soda
- ½ teaspoon salt
- 1 large egg
- ½ cup whole milk
- ¼ cup vegetable oil
- 1 teaspoon pure vanilla extract
- ½ cup boiling water
- 1 teaspoon instant espresso powder, optional
For the unbelievably luscious Chocolate Mousse:
- 4 large egg yolks
- ⅓ cup granulated sugar
- Pinch of salt
- 2 teaspoons pure vanilla extract
- 12 ounces semi-sweet chocolate, finely chopped
- 2 cups cold heavy whipping cream, divided
And for that perfectly glossy, rich Ganache topping:
- 4 ounces semi-sweet chocolate, finely chopped
- ½ cup heavy whipping cream
Instructions
Ready to create magic? Let’s walk through the steps to assemble your stunning Chocolate Mousse Cake. We’ll start with baking the perfect chocolate cake base:
- Preheat your oven to a precise 350°F (175°C) and generously butter a 9-inch springform pan. For easy release, line the bottom with a circle of parchment paper.
- In a large mixing bowl, meticulously whisk together the all-purpose flour, granulated sugar, both cocoa powders (ensure the black cocoa is sifted to prevent lumps), baking powder, baking soda, and salt until thoroughly combined.
- Into the dry ingredients, gently add the large egg, whole milk, vegetable oil, and pure vanilla extract. Whisk just until these wet ingredients are fully incorporated, being careful not to overmix, which can lead to a tough cake.
- If you’re using instant espresso powder, dissolve it completely in the ½ cup of boiling water. Carefully pour this hot liquid into your batter and whisk gently until everything is smoothly combined. Don’t worry, the batter will be quite thin.
- Transfer the liquid batter into your prepared springform pan, spreading it evenly.
- Bake for approximately 20–25 minutes. To check for doneness, a skewer or toothpick inserted into the center should come out clean.
- Allow the cake to cool in its pan for about 10 minutes before carefully transferring it to a wire rack. Let it cool completely to room temperature – this is crucial for the next steps.
- Once fully cooled, use a serrated knife to level the top of the cake, creating a flat surface for your mousse layer.
- Thoroughly clean your 9-inch springform pan. Prepare it again by lining the bottom with fresh parchment paper and the sides with a cake collar or another strip of parchment paper. This will help contain your mousse.
- Carefully place the leveled, cooled cake back into the prepared springform pan, ready for its mousse topping.
Now for the star of the show – crafting that unbelievably light and luscious Chocolate Mousse:
- In a heatproof bowl, combine the egg yolks and granulated sugar. Whisk them together until they are well blended and slightly pale.
- Set this bowl over a pot of gently simmering water, ensuring the bottom of the bowl does not make direct contact with the water. This creates a double boiler.
- Continuously whisk the mixture for about 10 minutes. It will gradually thicken, and you’ll know it’s ready when it reaches an internal temperature of 160°F (71°C) on a thermometer.
- Remove the bowl from the heat. Immediately whisk in the pinch of salt and pure vanilla extract.
- Add your finely chopped semi-sweet chocolate to the hot egg yolk mixture. Let it sit undisturbed for a minute or two to begin melting.
- In a separate small saucepan, gently heat ⅔ cup of the heavy cream until it’s steaming and you see small bubbles forming around the edges. Do not let it come to a rolling boil.
- Pour the hot cream over the chocolate mixture. Whisk everything together until you have a completely smooth, glossy, and uniform chocolate base.
- It’s essential to let this rich chocolate mixture cool completely to room temperature. This step prevents your whipped cream from melting.
- In a separate, chilled bowl, whip the remaining 1⅓ cups of cold heavy cream until it forms stiff peaks. Be careful not to over-whip it into butter.
- Gently fold about one-third of your whipped cream into the cooled chocolate mixture. Use a spatula and a light hand to combine.
- Continue by folding in another third of the whipped cream, followed by the final third. Mix just until the mousse is smooth, airy, and no streaks of whipped cream remain. Overmixing will deflate the mousse.
- Carefully pour the finished mousse over the chocolate cake base in the springform pan. Use an offset spatula to smooth the surface evenly.
- Refrigerate the cake for a minimum of 4 hours, or ideally overnight, until the mousse is completely firm and set.
Finally, let’s create that irresistible, glossy Ganache topping:
- Place your finely chopped semi-sweet chocolate in a medium, heatproof bowl.
- In a small saucepan, heat the ½ cup of heavy cream until it’s steaming and bubbling gently around the edges. Again, avoid boiling.
- Pour the hot cream directly over the chopped chocolate. Let it sit undisturbed for about 5 minutes, allowing the heat to melt the chocolate.
- After 5 minutes, begin whisking the mixture from the center outwards until it becomes completely smooth, shiny, and beautifully glossy.
- If the ganache feels too hot, allow it to cool slightly at room temperature until it’s warm but still pourable. Too hot and it might melt your mousse; too cold and it won’t spread.
- Once the cake is thoroughly chilled and set, carefully remove it from the springform pan. Gently peel away the parchment or cake collar from the sides.
- Pour the slightly cooled ganache over the top of the chilled cake. Use an offset spatula or tilt the cake gently to spread it evenly across the surface and down the sides if desired.
- Return the cake to the refrigerator for another 5–10 minutes to allow the ganache to set slightly before you slice and serve this magnificent dessert.
Serving and Storage Tips: Master Your Mousse Cake Experience
- For the most pristine and elegant slices, always serve your Chocolate Mousse Cake well chilled.
- Achieve perfectly clean cuts by using a sharp, thin-bladed knife. Dip it in warm water, wipe it dry between each slice, and cut with a confident, downward motion.
- Elevate your presentation by garnishing slices with delicate chocolate shavings, vibrant fresh berries (like raspberries or strawberries), a dusting of cocoa powder, or a dollop of freshly whipped cream.
- To maintain its structure and freshness, keep the cake refrigerated until the moment it’s ready to be served.
- Any leftover slices should be stored in an airtight cake container or wrapped tightly in the refrigerator, where they will remain delicious for up to 4 days.
- For optimal texture and to prevent the mousse from softening, avoid leaving the cake at room temperature for prolonged periods.
- This cake is an entertainer’s dream! You can easily prepare the entire dessert a day in advance, allowing you to focus on your guests.
- Yes, you can freeze it! For longer storage, tightly wrap individual slices in plastic wrap, then foil, and freeze for up to 1 month. Thaw them slowly overnight in the refrigerator before enjoying.
Variations: Unleash Your Inner Pastry Chef!
- Dark Chocolate Mousse Cake – For an intensely rich and sophisticated flavor profile, simply swap out the semi-sweet chocolate with your favorite high-quality dark chocolate in both the mousse and ganache.
- Milk Chocolate Mousse Cake – If you prefer a sweeter, milder, and creamier dessert that’s often a hit with younger palates, use milk chocolate for both the mousse and ganache layers.
- White Chocolate Mousse Cake – Create a stunning visual and taste contrast by replacing the chocolate mousse with a luscious white chocolate mousse, while keeping the rich chocolate cake base.
- Raspberry Chocolate Mousse Cake – Introduce a delightful fruity tang by spreading a thin layer of raspberry preserves between the cake and mousse, then adorn the finished cake with fresh, plump raspberries.
- Strawberry Chocolate Cake – For a burst of fresh flavor, arrange thinly sliced fresh strawberries directly over the chocolate cake layer before gently spreading on the chocolate mousse.
- Mint Chocolate Mousse Cake – Infuse a refreshing coolness by adding a small amount of peppermint extract to the chocolate mousse. Garnish with delicate chocolate curls and vibrant fresh mint leaves.
- Mocha Mousse Cake – Amp up the coffee notes by incorporating additional instant espresso powder into both the cake batter and a hint into the chocolate mousse mixture for a pronounced mocha experience.
- Peanut Butter Chocolate Mousse Cake – Indulge in a classic flavor pairing by spreading a thin, creamy layer of peanut butter over the cooled chocolate cake before adding the rich chocolate mousse.
- Hazelnut Chocolate Cake – Add an elegant crunch and nutty aroma by folding finely chopped, toasted hazelnuts into the ganache, or generously sprinkling them around the edge of the finished cake.
- Salted Caramel Chocolate Cake – Elevate the decadence with a drizzle of homemade or store-bought salted caramel sauce over the cake layer before applying the mousse, then finish with an extra caramel flourish on top.
- Oreo Chocolate Mousse Cake – For an extra layer of texture and fun, sprinkle crushed chocolate sandwich cookies (like Oreos) between the cake and mousse, or even incorporate them into the mousse itself.
- Chocolate Orange Mousse Cake – Create a bright and zesty citrus-chocolate fusion by adding finely grated orange zest to the mousse and a touch of orange extract to the ganache.
- Coconut Chocolate Mousse Cake – Transport your taste buds to the tropics by topping the cake with toasted shredded coconut and delicate chocolate curls for a delightful texture and flavor.
- Cherry Chocolate Mousse Cake – Enjoy the classic black forest flavors by adding a thin layer of cherry preserves or finely chopped fresh or jarred cherries between the cake and the mousse.
- Triple Chocolate Mousse Cake – For the ultimate chocolate lover, layer a dark chocolate cake base with a smooth milk chocolate mousse, all crowned with an intensely rich dark chocolate ganache, creating an extraordinary multi-chocolate experience.
FAQs: Your Chocolate Mousse Cake Questions, Answered!
1. Can I prepare this show-stopping Chocolate Mousse Cake in advance?
Absolutely! This cake is a dream for meal prep and entertaining. You can assemble the entire cake the day before your event and simply keep it chilled in the refrigerator until you’re ready to serve.
2. Why is it so important for the chocolate mixture to cool completely before I add the whipped cream?
This step is crucial for achieving that signature light and fluffy mousse texture. If the rich chocolate mixture is still warm when you fold in the whipped cream, it will melt the delicate cream, resulting in a runny, dense mousse instead of a perfectly airy one.
3. What if I don’t have black cocoa powder? Can I just use regular cocoa powder instead?
Yes, you can certainly substitute regular unsweetened cocoa powder for the black cocoa powder. However, be aware that your cake will have a slightly lighter color and a subtly different, though still delicious, chocolate flavor profile.
4. Is the espresso powder an absolute must for this cake?
Not at all! The instant espresso powder is completely optional. Its purpose is to subtly enhance and deepen the rich chocolate flavor without making the cake taste like coffee. Feel free to omit it if you prefer.
5. How long can I expect my Chocolate Mousse Cake to stay fresh?
When properly covered and stored in an airtight container in the refrigerator, your magnificent Chocolate Mousse Cake can be enjoyed for up to 4 days, though it rarely lasts that long!
6. Can I pop slices of Chocolate Mousse Cake in the freezer for later?
Yes, absolutely! For convenient future indulgence, individual slices can be tightly wrapped in plastic wrap and then aluminum foil, and frozen for up to 1 month. Just remember to thaw them overnight in the refrigerator before serving.
7. What’s the secret to getting those perfectly clean, elegant slices?
The trick to pristine slices is using a sharp, thin-bladed knife. Dip the knife in hot water, wipe it completely dry between each cut, and slice with a gentle, confident motion. This prevents sticking and ensures a beautiful presentation.
8. My chocolate mousse turned out too soft – what went wrong?
A common culprit for overly soft mousse is the chocolate mixture being too warm when the whipped cream was folded in, causing the cream to melt. Another reason could be that the heavy cream wasn’t whipped to sufficiently stiff peaks before being incorporated.
9. Can I use milk chocolate instead of semi-sweet chocolate for the mousse?
Absolutely! Swapping semi-sweet chocolate for milk chocolate will result in a sweeter, milder, and even creamier mousse, perfect for those who prefer a less intense chocolate experience.
10. I want to make my cake look extra special! What are some great ideas for decorating it?
The possibilities are endless! Enhance your cake with elegant chocolate curls, a delicate dusting of cocoa powder, generous dollops of freshly whipped cream, vibrant fresh berries, a luxurious drizzle of caramel sauce, a sprinkle of finely chopped nuts, or delicate chocolate shavings. Let your creativity shine!
This incredible Chocolate Mousse Cake isn’t just a dessert; it’s an experience. It masterfully brings together a tender, moist chocolate cake base, an ethereal homemade chocolate mousse, and a decadent, smooth chocolate ganache, culminating in an absolutely irresistible creation. With its stunningly elegant presentation and profoundly rich flavor, this cake stands out as the perfect choice for any special occasion or simply whenever that craving for a truly impressive chocolate treat strikes.